This guide will assist you to import PST file to Office 365 account with maximum security and data integrity. If you are searching for the same, your search will end today. Just go through this guide and you will get the most reliable and productive solution. Let’s get into it.
What are the Different ways to Upload PST files to Microsoft O365?
There are few ways to execute this task, however, most of them are not secured or reliable. You can face technical complications as well as, you face have multiple error encounters. Your data can also be compromised.
The biggest limitation is that you should be technically sound to execute this operation safely. Other approaches can be pretty costly, which might not suitable for performing this task on large scale. Therefore, it is recommended by many Office 365 IT admins to use professional software that can easily execute all the technicalities.
Let’s discuss the reliable software for the same to avoid any data loss or complications.
Modern Approach to Import PST file to Office 365 Account
You should always choose the tried and tested professional solution when it comes to data security. Hence, it is suggested to use Import PST to Office 365, this is a brilliant tool, specially designed to fulfill all the needs of Office 365 users.
Here are the quick steps to execute the whole operation in the safest environment.
5 Quick Steps to Import PST file to Office 365 Account are:
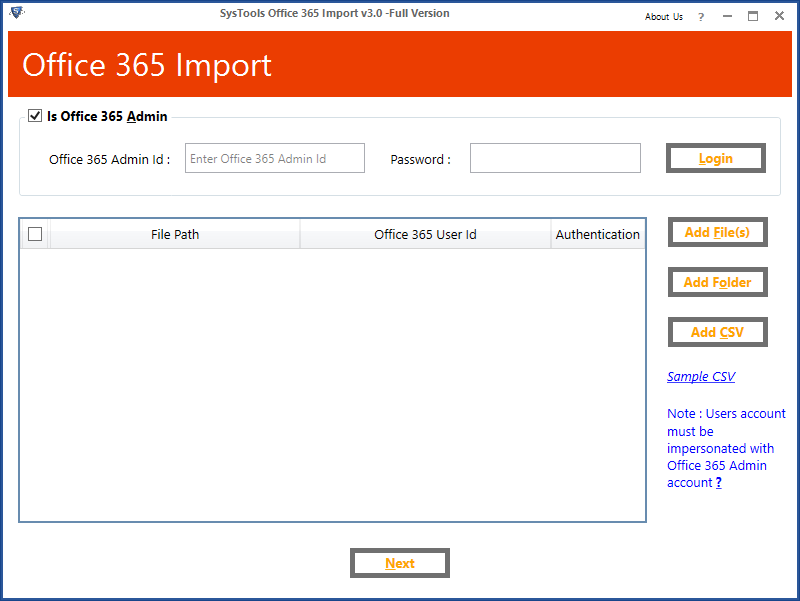
Step 1: Download & Launch the above software. Check the “Is Admin” option.
Step 2: Click on Add File(s) option to Import PST file
Step 3: Provide O365 Accounts details & Validate
Step 4: Apply filters if required & Hit Import Button to import PST file to Office 365 account.
Step 5: Process will start, download the CSV file if required for the report.
There are Some of the Highlighted Feature of this Software
- Upload all mailbox items such as emails, contacts, tasks to O365
- Offers bulk/multiple options to Import PST files into Office 365 mailboxes
- Comes with builtin date filter for selective data import
- Offers options to include or exclude deleted/ sent items while moving PST
- Keeps the data integrity and folder hierarchy while uploading PST files
- Provides Incremental Import options to eliminate files duplication
- Keeps meta data and all email attributes intact after conversion
Detailed Software Procedure for Importing PST files to Microsoft Office 365
Step 1: In the first step, you need to download and install the above-mentioned tool on your computer.
Step 2: Now, launch it and check the Is Admin option given on the main screen. Then, log in to the respective field, by using the Office 365 admin credentials to import PST file to Office 365 account.

Step 3: In this step, you need to click on the Add file(s) option given on the right side of the screen as shown below.

Step 4: You need to navigate the destination folder, where you have stored your PST files. And click on the OK button. This will list all the user’s PST files beside their email address bar.

Step 5: Now, use the respective user credentials to log in to each user’s accounts and authenticate them. Once, done with them, then click on the Next button to upload the PST file to Microsoft Office 365 account.

Step 6: Now, if you have required to import selective emails based on date, then apply the date filter respectively.

Step 7: Once, you follow all these steps as shown in the pictures, then click on the Import button and the software will start migrating PST to Office 365 safely.

Use the Free Trial
You can use the free trial version of this tool in order to download, click on the above link and download the utility. Sign in using your email account and activate the software. Once, activated you can use this software in order to check the working and performance before purchasing the full version.
Bringing It All Together
Let’s wrap up, this article describes the most trusted solution for a user’s query i.e. how to import PST file to Office 365 account? Although, manual options are available using the Azure Import Tool, but this might require the technicalities of Microsoft Azure and Office 365 altogether. Still, users may face complications that may lead them to data loss or corruption.
Hence, by using the above-mentioned software, even a novice user can easily execute this tough and tedious task with 100% data security and integrity.